Hi guys,
Today I will be talking about load balacing and its features, I will talk about how the load balancers handle its connections.
Before going straight to the point, I will explain the basics conecpts about load balance and then we can go further on the connection handling analysis.
Load Balancer
A Load balancer is a device that acts as a reverse proxy and distributes network or application traffic across a number of servers. Load Balancers are used to increase capacity (current users) and reliability of applications. They improve the overall performance of applications by decreasing the burden non servers associated with managing and maintaining application and network sessions, as well as by performing application-specific tasks.
They are grouped into categories, such as: Layer 4 and Layer 7. Layer 4 load balancer act upon data found in nework and transporte layer protocols such as TCP, IP, FTP, UDP whereas the layer 7 load balancers distribute requests based upon data found in application layer protocols such as HTTP.
Most of the load balancers use one of the following algorithm to distribute the packets:
- Round Robin
- Weighted Round Robin
- Least Connections
- Least Response Time
Layer 7 load balancers can further distribute requests based on application specific data such as HTTP headers, cookies or data within the application message itself, such as the value of a specific parameter.
Connection Handling – Overview
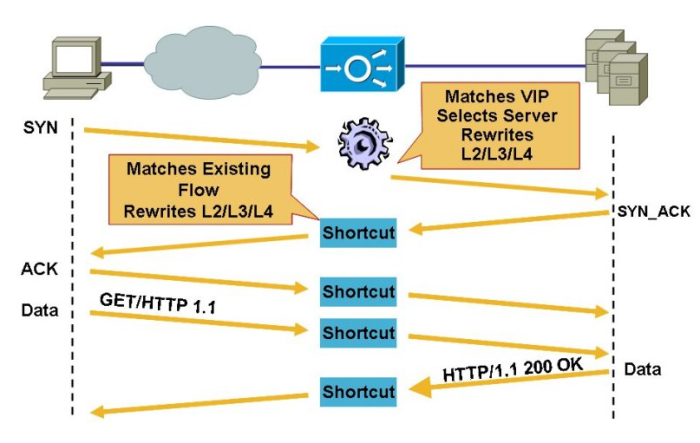
I will try to descrive how the Load balancers handles connections at Layer 4 and Layer 7. For Layer 4 connectinos, the LB receives a TCP packet from a client and load balances the connection to a server on the first packet. The SYN-ACK from the server matches an existing flow and the rest of the connection is handled in the fast path, which means the packt is accelerated in the hardware network processors. The ACE then completes the TCP handshake, this process applies to the following functions:
- Basic Load Balacing
- Source IP sticky
- TCP/IP normalization
The figure below shows the Layer 4 Flow setup:
For flow in application layer (L7 Flows) the ACE acts as proxy, intercepts the clients request that matches an L7 rule, and terminates the TCP connection. The ACE send back to the client a SYN_ACK message in response to the client TCP SYN, once the TCP sessions is complete a L7 request is done ( HTTP GET or POST). Look figure below:
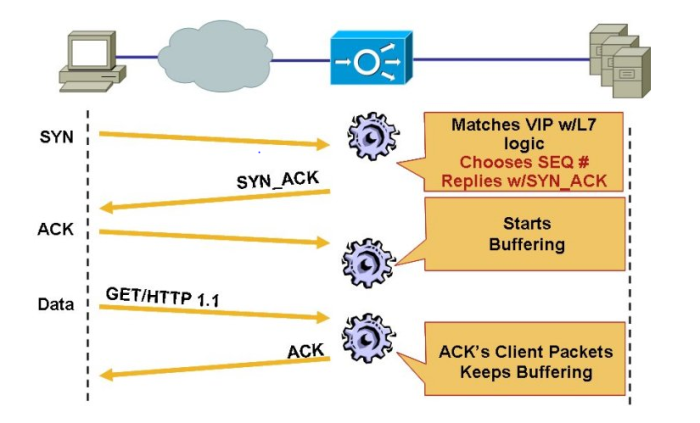
If you look at the figure above, you will se the client can only communcate directly with the ACE and the ACE is reponsible for communucating with the server load balacing the traffic according to what has been configured.
If you try to compare it to the real life, when you are renting an apartment, you are the end user (client), the ACE is the agency and the Server is the landlord ….You only talks to the agency , they (agency) reaches the landlords….=)
SSL Termination
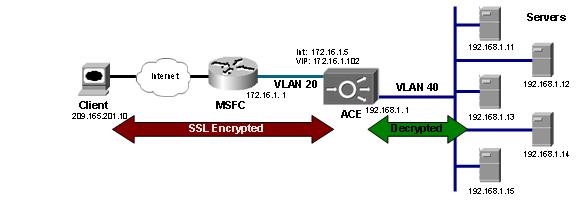
SSL Termination is aldo known as SSL Offloading, the client will establish a connection using HTTPS (SSL) to the VIP configured in ACE. HTTPS causes the clients TCP session to be encrypted between the browser and the ACE. Once the sessio reaches the ACE, the ACE will decrypt the session and forward it to a real server in clear text (HTTP). The following image show exactly how it works.
Well, when do we need that done ? Most of the times this kind of configuration is done when you need to allow external users to access systems inside your network, you need to ensure the outside traffic will be encrypted for security reasons.
Lets go the cool part of the blog, the configuration steps.
Configuring SSL Offloading on Cisco ACE.
In order to be able to terminate SSL sessinos, we need to configure both an SL certificate and a corresponding SSL key. Once imported, these SSL files are associated with an SSL proxy service that is applied to the VIP to enable SSL termination.
The SSL termination configuration begins like the basic L4 load-balacing configuration, by definig a VIP and corresponding server farm and rservers.
The configuration will be based on the diagram above.
ACE(config)# class-map match-all 102-vip
ACE(config-cmap)# match virtual-address 172.16.1.102 tcp eq 443
When adding the rservers to the server farm, consider the destination of the descrypted traffic, ACE use the rserver port defined in the server farm to properly translate the destination for the decrypted connection.
serverfarm host web
  rserver lnx1 80
    inservice
  rserver lnx2 80
    inservice
  rserver lnx3 80
    inservice
  rserver lnx4 80
    inservice
  rserver lnx5 80
    inservice
The VIP and server farm in this example allow the ACE to accept connections to the VIP on port 443 and forward them to a real server on port 80. Note that if the port is not provided, the VIP port will be preserved.
Most of SSL termination configurations begni by importing the certificate and key into ACE, the easiest way to do that is by placing the 2 files onto a secure FTP server and import it to the ACE.
ACE# crypto import ftp 172.25.91.127 cisco cert.pem cert.pem
ACE# crypto import ftp 172.25.91.127 cisco intermediate.pem intermediate.pem
ACE# crypto import ftp 172.25.91.127 cisco key.pem key.pem
ACE# crypto verify key.pem cert.pem
Once the SSL files have been verified, ACE can be configured with an SSL proxy service, which is a logical grouping of the certificates, key and SSL parameters used to define the characteristics of SSL termination.
ACE(config)# ssl-proxy service proxy-1
ACE(config-ssl-proxy)# cert cert.pem
ACE(config-ssl-proxy)# key key.pem
ACE(config)# crypto chaingroup intermed-1
ACE(config-chaingroup)# cert intermediate.pem
ACE(config)# ssl-proxy service proxy-1
ACE(config-ssl-proxy)# chaingroup intermed-1
Within the ACE, all SSL termination is fully integrated. Therefore, there is no need to configure internal VLANs or IPs to handle decrypted traffic. All that is required to enable SSL termination is to attach the SSL proxy service configured above to a VIP in a service policy.
ACE(config)# policy-map multi-match client-vips
ACE(config-pmap)# class 102-vip
ACE(config-pmap-c)# ssl-proxy server proxy-1
At this point the ACE should be configured with a working SSL termination configuration. Make a test connection to the VIP address using HTTPS in a web browser, and you should see a response from one of the real servers.
Checking – Show Commands
Follow below a list of show commands that can be used to double check this configuration:
ACE(config)# policy-map multi-match client-vips
ACE# show crypto files
ACE# show crypto certificate all
ACE# show crypto key all
ACE# show crypto session
ACE# show crypto hardware
ACE# show service-policy  detail
Configuring SSL OffLoading on F5 BIG IP
I will not explain everything again, I will walk youn through the steps so you can have a big picture of how to set up the SSL Termination on BIG IP.
SSL Certificate and Key
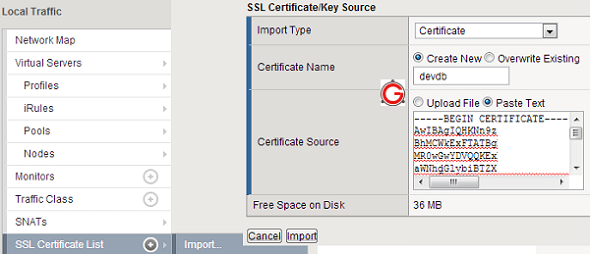
Login into F5 -> Go to Local Traffic -> SSL Certificate List -> Import, which will show the following UI, here , do the following:
- Import Type: Select Certificate
- Certificate Name: Select “Create New” enter the certificate name.
- Certificate Source: Select “Past Text”, paste the content of your SSL certificate here.
- Click Import.
Now you have to import the key, follow the instructions below:
Go to Local Traffic -> SSL Certificate List -> Select the certificate you just created-> Click in Key Tab and follow the steps below:
- Import Type – Key
- KeyName – It will display your certificate name
- Key Source – Paste your key here.
Now, if you go to “Certificate List”, you’ll see the “devdb”, but under the “Contents” column it will say “Certificate and Key”, which indicates that you’ve uploaded both certificate and key.
Once you have done it, you should go to “Certificate List”, then you will be able to see the certificate name in there.
SSL Profile
Go to “Local Traffic” -> Profiles -> SSL -> Client, which will display all the current SSL profiles.
Click on “Create” button on the top right corner, which will display the following:
- Name: Enter the SSL profile name.
- Parent profile: Leave it default at clientssl.
- If you have a passphrase to enter for your key, you should do it here, by selecting “Advanced”. If not, just “Basic” information is good.
- Certificate: Select the certificate you created above.
- Key: Select the key you created above.
- Passphrase: The passphrase for the SSL key.
- Leave all other fields default.
F5 Pool
After you create the SSL certificate/key, and SSL profile, it is time to create a pool, and assign members to it.
Go to “Local Traffic” -> Pools -> Pool List as figure below:
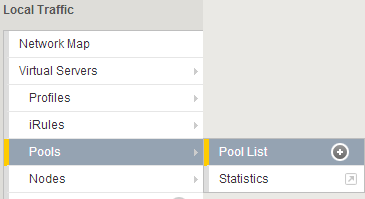
From here, click on “Create” button on the top right corner, which will display the following:
- Configuration: Leave it as “Basic”
- Name: Enter the pool name.
- Description: Enter some meaningful info here
- Health Monitors: Select “tcp” from the “Available” list.
- Load Balancing Method: Select “round robin”
- New Members: Click on “New Node” radio button, and enter the ip-address of the node1.
- Port: Select HTTP here, as the nodes themselves will be running only on HTTP. (If you are doing HTTPS passthrough, you’ll select HTTPS her. But, we are not doing that in our example)
- Add: Click on add to add the node. Repeat the same process to add more nodes.
- Once you’ve added both the nodes, click on “Finished”, which will create this new
Create HTTPS Virtual Server
Now it is time to create the HTTPS Virtual Server that will be use the pool we just created:
Go to “Local Traffic” -> Virtual Servers -> Virtual Server List. Click on “Create” button on the top right corner, which will display the following:
- Name: Enter the name of the virtual server.
- Description:
- Type: Select standard
- Destination: Select “Host”, and enter the name of the virtual server. (For example, 192.168.102.2). So, if someone comes to 192.168.102.2 on SSL, it will get redirected to one of the nodes in the pool.
- Service Port: Select HTTPS, as incoming request to the virtual server itself will be in SSL.
- SSL Profile (Client): select the profile from the list.
- Leave everything else default on this screen and create the virtual server.
Once you have done all set up mentioned above, you can go to the browser and try to connect into the page, the BIG IP will do the SSL encryption and transfer the traffic to one of the HTTP servers.
I hope this post helped you to understand how Load Balancers encrypt and descrypt packets when doing SSL Termination.
Thanks for reading !!!
Renato Gentil
